When in Manila, it’s part of our job to cover events, travel to new places, and conduct interviews. Naturally, we have to document all of these adventures.
While I frequently lug around my DSLR and laptop, there are days when a smart phone alone would do a better job. Without having the added responsibility of carrying heavy hardware and watching over my pricey gadgets, I get to be more mobile and focused.
I like the iPhone’s quality for taking photos and videos. I also like the post-processing apps, which make my life so much more convenient. Shooting, editing, and posting could be done from my phone! Even WordPress has an excellent app to make uploading blog posts easy. Because of these, my iPhone has become my mobile office.
But here’s the big problem: storage.
My iPhone’s memory is only 16GB, which means its capacity is only 11.7 GB. There’s nothing worse than being told by your phone that you could no longer take any more photos because your storage is full! You end up missing very important coverage, and looking unprepared and unprofessional. (Imagine: everyone else is shooting with their DSLR’s, while you’re hastily deleting old photos that you may or may not have backed up yet.)
If you could relate to these struggles, here are five helpful tips to get more storage on your iPhone.
(P.S. I know #5 makes me look like an over-promising scammer, but please give me the benefit of the doubt and try it out. It ACTUALLY works–even if I can’t explain why or how! I attached screenshots as proof!)
1.) Check how much memory you have, and what apps are taking out the most space.
I used to go crazy on deleting old photos and old apps, only to find out that my biggest space hogger was Spotify and Music. For Spotify, I had tons of outdated playlists. What I did was to delete the Spotify app, download the app again, and become more selective on which songs to make available offline. For the Music app, I had tons of audiobooks! I committed to syncing only a maximum of three audiobooks at a time, and store the rest in my hard drive.
This immediately freed me of almost 3GB.
Your major storage consumer might be something else, and it’s best to know it before proceeding to the other steps. To do this, you go to Settings -> General -> Storage and iCloud Usage.
2.) Make it a habit to back up and declutter your digital files.
This step’s benefits go beyond securing more storage space for your iPhone. It could also keep your life more organized. It forces you to take a daily break: to record and reflect. Just as it is probably your daily habit to charge your iPhone, try making it a daily habit to do the following:
See the photos you snapped for the day and sort them accordingly. Some are notes and reminders you won’t use anymore. Delete. Some would remain useful for record-keeping. Sort accordingly in your laptop.
Plug your phone into your laptop and select Remove Already Imported from iOS Device in the Photos App. That way, your phone is wiped clean daily. Your laptop doesn’t become cluttered because you deleted the photos before importing them to your laptop. And while Apple’s Photos app takes a while to get used to, I think it has a lot of potential. It automatically sorts our locations, faces, dates, and more.
If you de-clutter your digital files at least once a day, it’s bound to make your life so much easier in the long run.
3.) Quick fixes: optimize your setting for the Messaging and Photos app.
1.) Messaging apps could be hogging your storage space, especially those with photos and videos attached. If you’re confident that you won’t need them anymore, delete. To avoid having to repeat this process, go to Settings -> Messages -> Message History -> Select Keep Messages -> Select 30 Days.
2.) Clear the Recently Deleted folder in your photos. Apple stores your deleted photos, and this takes up a lot of space. Go to Photos -> Albums -> Recently Deleted -> Delete.
3.) Turn off Photo Stream. If you go to the Photos app in your phone and look at the bottom, you will see Photos, Shared, and Albums. The Shared category shows you the different photos synced across all your Apple devices. Sometimes, it’s useful–especially when I need to transfer files wirelessly. Most of the times, there’s no need for it. It only takes up space on all of your devices. To disable this feature, go to Settings -> iCloud -> Photos -> iCloud Photo Sharing. Turn the iCloud Photo Sharing option off.
4.) Make Stream + Cloud your new best friends.
Stream: Instead of downloading all your music and movies, try streaming them. I think Spotify is the best, and its monthly rate is worth it. In the long run, I save up storage space and time Torrenting (hehe). I also discover new kinds of music because of Spotify’s genius features!
Cloud: Back up your files through cloud storage. There are tons of free cloud services. You automatically get 5GB free every month from Apple. It costs less than a dollar to upgrade to 50GB a month. But there are many other free cloud services, too. I like Google Drive, Google Photos, and Dropbox. I only back up my files on Cloud when I’m sleep. That way, backing up to cloud doesn’t slow down my Internet while I’m using it in the day to work.
5.) The most genius hack of all: try to rent a movie on iTunes.
I know this makes me sound like a scammer. When I first saw this tip on an article, I almost felt stupid for trying! But I tried it, and it actually works!
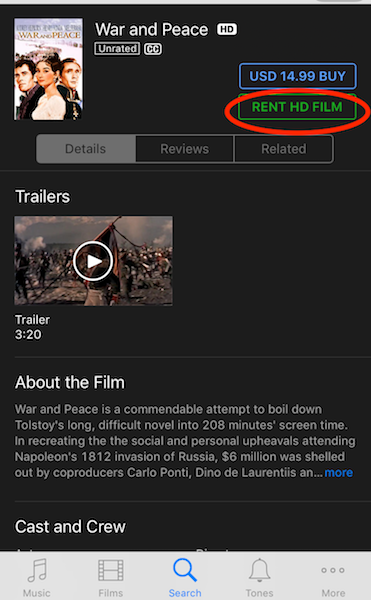
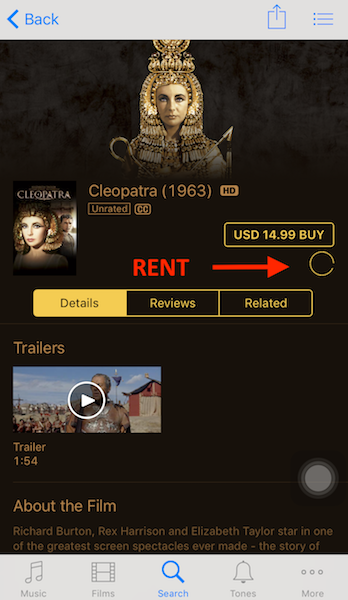
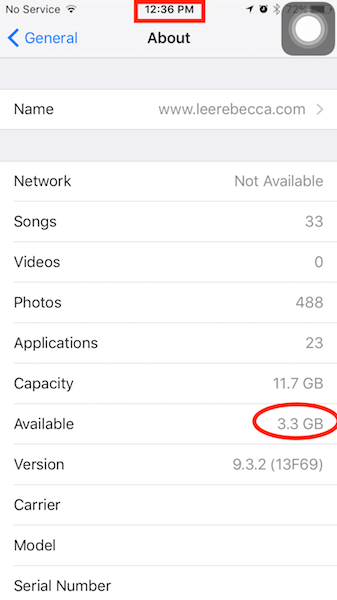
Here’s what you do: go to Settings and see how much storage you have left. Let’s say you have 3.3 GB left. On your phone, go to the iTunes Store app. Look for a really long movie that would require a LOT of storage space. Rule of thumb is to look for a movie that would require more storage space than what you have left (for this example, 3.3 GB).
Some examples of long movies: The Lord of the Rings: The Two Towers is 6.83 GB. War and Peace (1956) is 8.86GB. Lawrence of Arabia (Restored Version) is 8.19GB. Cleopatra is 10.3 GB.
Once you find a movie, click RENT. Don’t worry–you’re not actually renting it! You can’t possibly rent a movie that needs 10GB when you only have 3.3GB available.
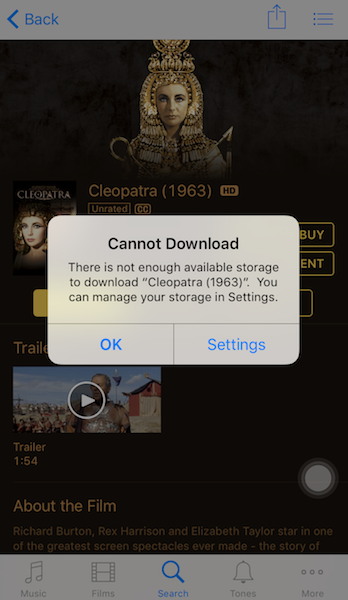
You will get a message that tells you, “CANNOT DOWNLOAD: There is not enough available storage to download Cleopatra (1963). You could manage your storage in Settings.”
Go to Settings, and check how much storage you have available.
You’ll most probably see that you magically and automatically have more storage! Without deleting anything!
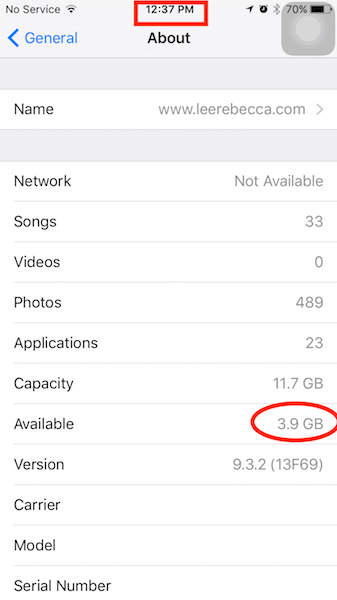
From the screenshots I took, you’d see the time stamps: 12:36 and 12:37. You would see that the number of songs, photos, videos, and apps remain consistent. BUT the available storage increased.
Repeat the process again and again and again. (It could be the same movie.) Eventually, the storage space will stop rising–but different users had different experiences.
I started with around 3GB when I tried this out. Within seconds and without deleting anything, I now have 3.9 GB. Not much, I know. BUT this quick hack took only a few seconds. It beats having to go over all the apps, photos, messages and overthinking which to delete.
And there are some Redditors who tried this and ended up freeing GIGABYTES of space! Some went from 650MB to 2.2GB, some went from 614MB to 4.2 GB, and more. I suggest checking out the thread yourself. Some Redditors say that this process automatically deletes your cache. If this is true, then the amount of extra storage you get will depend on how much cache you have.
WARNING: Do this only through your phone, not your laptop or your personal computer. One of the Redditors mistakenly did this through the iTunes Store in his laptop, and now he has a copy of War and Peace.
I’m really curious how this will work on your iPhones! Share your stories (and screenshots!) below. If you have more iPhone storage hacks, help us out by commenting below!

